
Automated online booking & scheduling for WordPress: fully customizable booking form with online payments, notifications, and Google Calendar sync.
Bookly Pro add-on enables advanced features of Bookly online appointment scheduling plugin. With Bookly Pro, you can remove all the limitations of the free version of Bookly WordPress booking plugin.
- Fully-customizable booking form that can be used on any device;
- Filterable, sortable and searchable booking list that you can print or export to CSV;
- Unlimited number of Staff Members with individual working schedules, prices, and ability to manage their profiles and online booking calendar;
- Unlimited number of Services which you can group into categories and set unique colors for easier viewing in Bookly Calendar;
- Importable and exportable customer base with unlimited clients list which displays payments stats and internal notes about the client;
- Various templates for customizable Email and SMS notifications;
- 2-way synchronization between Bookly Calendar and Google Calendar which automatically reflects all updates in Bookly in your Google Calendar;
- Integration with PayPal Express Checkout (note that this method is deprecated as of January 1, 2017 and no longer serviced by PayPal for new customers), the list of completed and pending payments;
- Built-in analytics with booking statistics;
- WooCommerce compatibility;
- Multi-language support – 12 languages included;
- Six months of 24/7 online customer support.
Once you purchase and install Bookly Pro, you will have Bookly plugin and Bookly Pro (Add-on) activated. You are free to add more advanced functionality to your default configuration with various Bookly add-ons for automating your online booking system.
If you use the legacy version of paid Bookly, please update to the latest version. Follow the instructions on the migrator page to switch to the new Bookly Pro with ease and for free.
Simplify Your Booking with Bookly Pro
Bookly Pro is the best booking plugin for WordPress websites (customer’s words – not ours). The process of booking appointments is fully customizable for your clients. It’s anywhere from 2 to 6 easy Steps. Here’s a walkthrough of the user experience in the standard 6-Step scheduling process.
This piece touches on add-ons, and focuses more on the standard booking plugin. Check out our add-ons and the deeper customization options they provide.
How does Bookly Pro work?
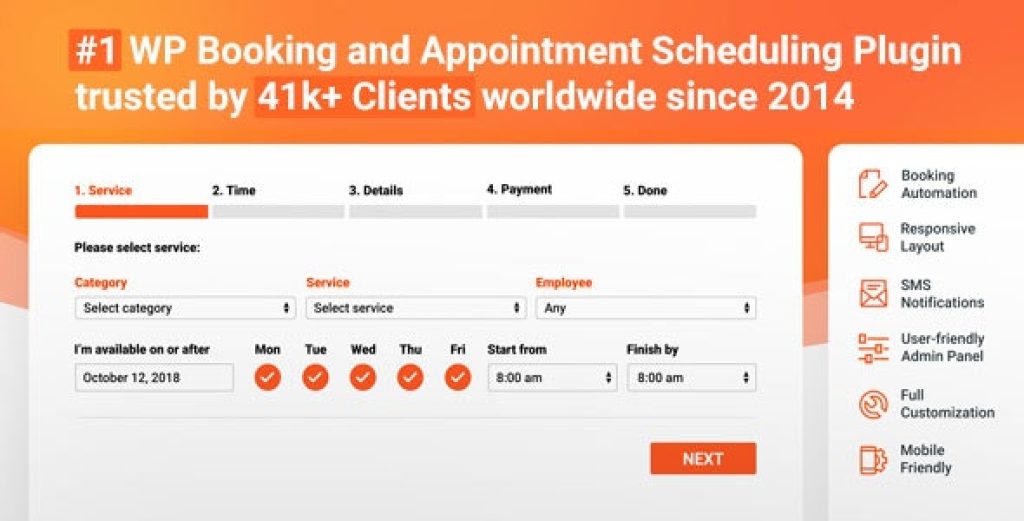
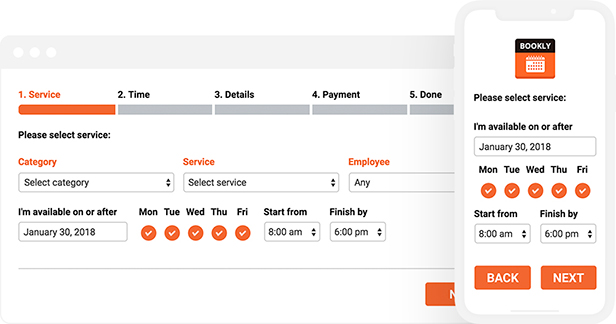
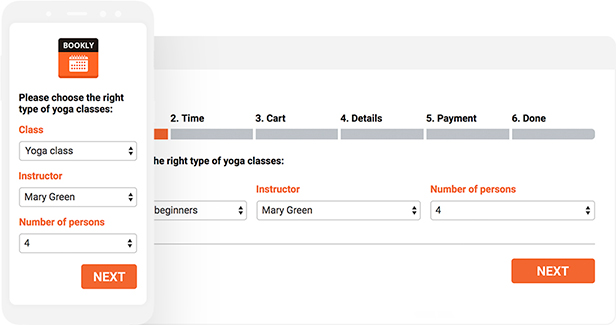
Step 1: Upon arrival at the page containing the booking plugin, the client enters the following information:
- Desired service
- Desired staff member
- Desired date and time

Note: Let customers decide on the number of people they wish to book. How: With Group Booking add-on, increase the capacity of a service in the Services tab and untick the ‘Number of Persons’ checkbox while integrating the plugin with your pages.
Service Extras, one of our most popular add-ons, allows you to add extra products or services to an appointment. When added, a new step will appear in the booking process, pictured below.
Step 2: Based on the preferred date & time, the booking system offers a list of available time slots. The customer can browse through the scheduling list and choose the time that suits them.

With the Cart add-on, your clients can book multiple appointments in one booking session. This feature adds an option to ‘book more’ right after Step 2. The ‘book more’ button will bring them back to Step 1, while storing the current booking on their cart.
Two add-ons are worth mentioning at this point. The Chain Appointments add-on allows the client to book different services in one visit. For example in a dentist’s office: a cleaning, whitening and check-up can be booked in sequence.
Multiply Appointments add-on allows your client to book identical services back-to-back. This is useful for group bookings where clients are assisted individually.
All booked appointments will be displayed together with their dates, times, staff members, and prices.

Step 4: User Info
Here’s where customers insert info for organizational or marketing purposes. The defaults are name, phone number and email. These fields cannot be removed, but the phone number can be replaced with a Skype ID. More fields can be added as desired.
Your customers can also leave notes here on the booking system. Like their favorite spa cocktail or a request for parking space.

Step 5: Payment
The customer can choose between multiple payment options, including offline payment (cash on arrival). There are 10+ online payment options that you can choose from and enable for your plugin. Read more on these options and how to set them up.

Step 6: Booking Confirmation
Appointment confirmed. If you’ve set up notifications (highly recommended), a confirmation email and a text message (SMS) with booking details are sent to the customer.
If you have switched on the pending appointments feature, we recommend that you change the wording of this last step. An acknowledgement or heads-up to say that you’ll be in touch to confirm the booking would be better.